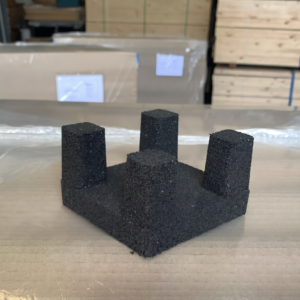
Acoustic Cradles
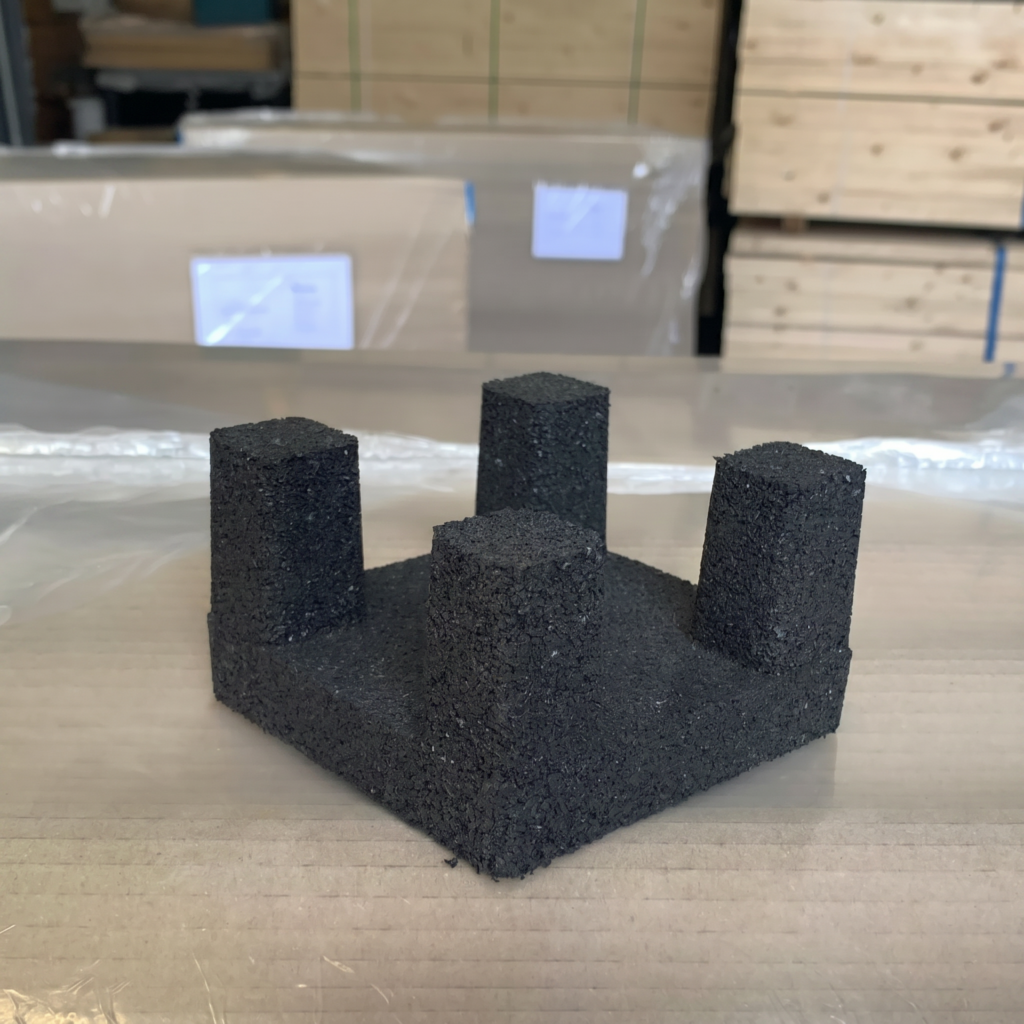
Acoustic Cradles are adjustable acoustic floor supports designed to support timber battens as part of a cradle and batten acoustic flooring system. They help create a level raised floor while reducing impact noise transfer through the structure below.
The system uses patented recycled rubber crumb cradles and packers to provide resilient support beneath timber battens. Acoustic Cradles are commonly used in conversion, refurbishment and new-build projects where impact noise reduction, uneven floor levelling and dry floor construction are required.
What are Acoustic Cradles used for?
Acoustic Cradles are used to support timber battens in raised acoustic floor systems. They are especially useful where the structural floor is uneven and needs to be levelled without using a wet screed.
The cradle and batten system creates a resilient floating floor build-up, helping reduce impact noise from footfall and movement. It can also create space for services and, depending on the system design, may be used with acoustic insulation, chipboard, floorboards and underfloor heating.
How do Acoustic Cradles work?
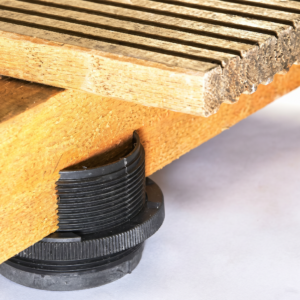
Acoustic Cradles work by supporting timber battens above the structural floor. The recycled rubber cradle base helps isolate the batten from the structure below, reducing direct vibration transfer.
Packers can be used with the cradles to adjust the finished floor height and correct uneven structural floor levels. This makes the system useful where a level floor finish is needed over an irregular concrete or timber base.
What type of noise do Acoustic Cradles help reduce?
Acoustic Cradles are mainly used to help reduce impact noise. This includes footfall noise, dropped items, furniture movement and vibration passing through the floor structure.
They can also support the overall acoustic performance of a floor system when used with suitable acoustic insulation, deck boards, perimeter isolation and sealing. Airborne noise performance will depend on the full floor and ceiling construction.
Where can Acoustic Cradles be used?
Acoustic Cradles are suitable for a range of floor construction and refurbishment applications, including:
- Acoustic floating floor systems
- Cradle and batten floor build-ups
- Concrete floor levelling
- Timber floor upgrades
- Conversion projects
- Refurbishment projects
- New-build residential projects
- Flats and apartments
- Hotels and multi-occupancy buildings
- Projects requiring a dry alternative to screed
- Floors requiring a service void beneath the deck layer
Why choose Acoustic Cradles?
Acoustic Cradles provide a dry, adjustable alternative to traditional screed floor construction. Because the system does not require drying time, it can help speed up installation and simplify the construction sequence.
They are also useful where floor levels need to be corrected on site. By using different cradle sizes and packers, the installer can adjust the batten height to create a level finished floor.
Acoustic Cradles vs screed — what is the difference?
Traditional screed is a wet floor levelling method that requires drying time before the next stage of work can continue. Acoustic Cradles provide a dry floor levelling system using resilient rubber cradles, timber battens and deck layers.
This can reduce waiting times, lower structural loading and make it easier to accommodate services beneath the floor. The cradle and batten system can also support acoustic performance by reducing direct impact vibration transfer into the structure below.
Key benefits
- Adjustable acoustic floor support — helps level uneven structural floors.
- Recycled rubber crumb cradles — provides resilient support beneath timber battens.
- Designed for Robust Detail FFT2 systems — suitable for acoustic floor specifications where relevant.
- Helps reduce impact noise — useful for footfall and vibration control.
- Dry alternative to screed — no drying or curing time required.
- Can accommodate services — creates a void beneath the floor deck.
- Useful for uneven floors — packers allow on-site height adjustment.
- Suitable for refurbishment and new build — practical for residential and commercial projects.
- Can be used with underfloor heating — subject to system design and manufacturer guidance.
- Works as part of a complete floor system — combine with battens, deck boards, insulation and perimeter isolation.
Helpful advice before buying
Acoustic Cradles should be used as part of a complete acoustic floor system. The final performance will depend on the structural floor, cradle spacing, batten size, deck layer, insulation, perimeter isolation and installation quality.
Before ordering, check the required finished floor height, batten size, loading requirement and cradle spacing. The correct cradle and packer combination will depend on the existing floor level and the required finished floor build-up.
If you are unsure which Acoustic Cradle option is right for your project, please contact our team before ordering. We can help advise on the most suitable cradle, batten and packer arrangement based on your floor structure, level requirements and acoustic target.
Acoustic Cradles Technical Specifications
Acoustic Cradles are recycled rubber crumb supports used within adjustable cradle and batten acoustic flooring systems. They are designed to support timber battens, level uneven floors and help reduce impact noise transfer through the floor structure.
Product Specification
| Product Name |
Acoustic Cradles |
| Product Type |
Acoustic cradle and batten floor support system |
| Material |
Patented recycled rubber crumb cradle system |
| Application |
Acoustic floating floors, cradle and batten systems, refurbishment floors and new-build floor systems |
| Suitable For |
Concrete floors, structural floors, conversion projects, refurbishment projects, new-build projects and floors requiring impact noise reduction |
| System Standard |
Designed to meet Robust Detail FFT2 standards when used as part of the correct system |
| Main Noise Type |
Impact noise and vibration transfer |
| Primary Function |
Supports timber battens, helps level uneven floors and provides resilient acoustic separation |
| Installation Method |
Set out beneath timber battens at specified centres, adjusted with packers where required, then finished with suitable deck boards or flooring layers |
| Common Batten Sizes |
25mm/30mm battens and 45mm/50mm battens, depending on system design |
| Cradle Calculation – 25mm/30mm Battens |
Approx. 11 cradles per m², based on 300mm batten-to-batten centres and 300mm cradle-to-cradle centres |
| Cradle Calculation – 45mm/50mm Battens |
Approx. 6 cradles per m², based on 400mm batten-to-batten centres and 600mm cradle-to-cradle centres |
| Available Cradle Options |
25/20 – 20mm base with 25mm leg; 25/10 – 10mm base with 25mm leg; 20/40 – 20mm base with 40mm leg |
| Available Packer Options |
2mm packers, 5mm packers, 10mm base packers and 30mm base packers |
| Use with Underfloor Heating |
Can be incorporated into suitable underfloor heating floor systems, subject to full system design and manufacturer guidance |
| Dry Construction |
Yes — dry alternative to traditional screed systems |
| Standalone Product? |
No — should be used as part of a complete acoustic cradle and batten floor system |
Available Options
Acoustic Cradles are available in a range of cradle and packer options to suit different floor heights and levelling requirements.
- 25/20 — 20mm base with 25mm leg
- 25/10 — 10mm base with 25mm leg
- 20/40 — 20mm base with 40mm leg
- 2mm packers — box of 300
- 5mm packers — box of 100
- 10mm base packer — sold individually
- 30mm base packer — sold individually
Suitable Applications
Acoustic Cradles can be used in a range of floor applications, including:
- Cradle and batten acoustic floor systems
- Robust Detail FFT2 floor build-ups
- Apartment and flat conversions
- Residential refurbishment floors
- New-build acoustic floors
- Hotel and multi-occupancy projects
- Dry floor levelling systems
- Floors over uneven concrete slabs
- Floors requiring service voids
- Projects where screed is not practical or desirable
Acoustic Use
Acoustic Cradles are used to reduce impact noise by separating the timber batten and deck layer from the structural floor below. The resilient rubber support reduces direct vibration transfer and helps create a floating floor build-up.
For best results, the cradle system should be combined with the correct batten spacing, suitable deck boards, acoustic insulation where required, and good perimeter isolation.
Common System Uses
- Installed directly over a damp-proof membrane on concrete slabs where specified
- Used with timber battens to create a raised acoustic floor
- Used with packers to level uneven structural floors
- Used to create space for services below the deck layer
- Combined with acoustic insulation between battens
- Finished with chipboard, plywood, acoustic deck boards or other suitable flooring boards
- Used where pre-completion testing or Robust Detail acoustic performance is relevant
- Used as a lightweight dry alternative to screed
Important Performance Note
Acoustic Cradles are acoustic support components, not a complete soundproofing system on their own. The final acoustic result depends on the full floor build-up.
Cradle spacing, batten size, floor deck, ceiling construction, acoustic insulation, perimeter isolation, loading, workmanship and flanking paths can all affect performance. For Building Regulations or Robust Detail projects, use the correct tested system data and seek project-specific acoustic advice where required.
Handling Advice
Store cradles and packers clean, dry and protected before installation. Check that the structural floor is suitable, stable and ready for the system before fitting.
Do not install cradles onto loose, unstable, contaminated or unsuitable surfaces. Confirm the loading, finished floor height and acoustic specification before installation.
How to Install Acoustic Cradles
Acoustic Cradles are installed beneath timber battens to create a raised acoustic floor system. They help level the floor, support the deck layer and reduce impact noise transfer into the structure below.
For best results, the cradles should be installed as part of a complete cradle and batten acoustic floor system, using the correct cradle spacing, batten size, packer arrangement and perimeter isolation.
What You’ll Need
- Acoustic Cradles
- Acoustic cradle packers, where required
- Suitable timber battens
- Acoustic insulation, where specified
- Chipboard, plywood, acoustic deck boards or suitable floor deck layer
- Damp-proof membrane, where required by the system
- Perimeter isolation strip, where required
- Acoustic sealant, where required
- Tape measure
- Pencil or marker
- Laser level, string line or spirit level
- Saw for cutting battens
- Drill/driver
- Suitable fixings for the deck layer
- PPE gloves
- Safety glasses
- Knee pads
- Waste bag for offcuts
Before You Start
Check the structural floor before installing the Acoustic Cradles. The base should be clean, stable, load-bearing and suitable for the full acoustic floor build-up.
Confirm the required finished floor height, batten size, cradle spacing and packer requirement before starting. The cradle and packer arrangement should be selected to suit the existing floor level and the finished floor height.
Where the system is being used for Building Regulations or Robust Detail compliance, follow the specified floor build-up and seek project-specific guidance where required.
Step 1: Prepare the Structural Floor
Make sure the existing floor is ready for installation. The base should be:
- Clean
- Dry or protected with the correct membrane where required
- Stable
- Load-bearing
- Free from loose debris
- Free from sharp projections
- Suitable for the intended acoustic floor system
Remove loose material and make sure any obvious structural problems are corrected before installing the cradles.
Step 2: Install the Damp-Proof Membrane Where Required
If the system is being installed over a concrete slab, a damp-proof membrane may be required before the cradles are set out.
Lay the damp-proof membrane according to the project specification and manufacturer guidance. Make sure it is continuous and does not compromise the acoustic floor build-up.
Step 3: Plan the Batten Layout
Set out the timber batten positions before placing the cradles.
The supplier calculation guidance is:
- 25mm/30mm battens — approximately 11 cradles per m², based on 300mm batten-to-batten centres and 300mm cradle-to-cradle centres.
- 45mm/50mm battens — approximately 6 cradles per m², based on 400mm batten-to-batten centres and 600mm cradle-to-cradle centres.
Always confirm the correct spacing for the specific floor build-up, loading and deck board specification.
Step 4: Set Out the Cradles
Place the Acoustic Cradles along the marked batten lines at the required centres.
Make sure each cradle sits flat and stable on the base. Add cradles at batten ends, joints, door thresholds, perimeters and areas requiring additional support.
Do not leave unsupported batten joints or sections that could flex under load.
Step 5: Add Packers Where Required
Use cradle packers where additional height adjustment is required.
Available packer options include:
- 2mm packers
- 5mm packers
- 10mm base packers
- 30mm base packers
Packers should be used to correct uneven structural floor levels and achieve a level batten system. Check levels regularly as you work across the floor.
Step 6: Install the Timber Battens
Place the timber battens into the cradle supports.
Make sure the battens sit securely in the cradles and follow the planned layout. Where battens are joined, make sure the joint is fully supported.
Use a laser level, string line or spirit level to check the batten height and adjust the cradle/packer arrangement as required.
Step 7: Check the Floor Level
Before installing the deck layer, check the full batten layout for level, stability and support.
Check for:
- Rocking cradles
- Loose battens
- Unsupported joints
- Incorrect cradle spacing
- Excessive batten flex
- High or low areas
- Perimeter areas requiring extra support
- Services interfering with the batten layout
Make any corrections before the floor deck is installed.
Step 8: Install Services Where Required
If the cradle system is being used to accommodate services, install or route them before fitting the deck layer.
Do not notch, cut or weaken battens unless the system designer or structural guidance allows it. Make sure services do not create rigid acoustic bridges through the floor system.
Where underfloor heating is used, follow the heating system manufacturer’s guidance and make sure it is compatible with the cradle and batten floor build-up.
Step 9: Install Acoustic Insulation Where Specified
Where the acoustic floor design requires insulation between the battens, install the specified acoustic mineral wool or floor insulation before fitting the deck layer.
The insulation should fit neatly between battens without being overly compressed. Do not force insulation under the battens or around cradles in a way that creates instability.
Step 10: Maintain Perimeter Isolation
For acoustic floors, avoid hard contact between the floating floor and surrounding walls or structural elements.
Install perimeter isolation strip where required. Leave the correct expansion or isolation gap around the edge of the floor and seal with acoustic sealant where specified.
Good perimeter detailing is important because rigid contact at the edges can reduce acoustic performance.
Step 11: Fit the Floor Deck
Once the cradle, batten and insulation system is level and stable, install the specified deck layer.
This may include:
- Chipboard flooring
- Plywood
- Acoustic deck boards
- Other suitable floor sheet materials
Follow the board manufacturer’s fixing instructions. Make sure all board joints are properly supported and staggered where required.
Step 12: Final Checks
After the deck layer is installed, inspect the finished floor.
Check that:
- The floor is level
- The deck is stable
- There are no unsupported board joints
- The cradles are not overloaded
- Perimeter isolation has been maintained
- No rigid acoustic bridges have been created
- Services have not compromised the floor system
Installation Tips
- Confirm the correct cradle type before starting.
- Use the right packer combination to achieve the finished floor height.
- Set out batten lines carefully before placing the cradles.
- Check levels regularly with a laser level or spirit level.
- Support all batten joints and board joints properly.
- Do not install over loose or unstable surfaces.
- Maintain perimeter isolation in acoustic floor systems.
- Use acoustic insulation between battens where specified.
- Follow Robust Detail or project-specific acoustic guidance where relevant.
- Use Acoustic Cradles as part of a complete acoustic floor build-up, not as a standalone solution.
Important Soundproofing Note
Acoustic Cradles can help reduce impact noise transfer by supporting the floor on resilient rubber cradles, but the final result depends on the complete acoustic floor system.
Cradle spacing, batten size, deck layer, acoustic insulation, ceiling construction, perimeter isolation and flanking paths can all affect performance. If you are unsure how to use Acoustic Cradles in your project, please contact our team before installation.